Webcasting on a server-grade machine such as a laptop or desktop is routine and unremarkable. Streaming through modem port forwarding is similarly straightforward. What is far more challenging, however, is achieving stable, long-term webcasting using only a mobile phone as a Wi-Fi hotspot and a compact Raspberry Pi Zero instead of a full-sized computer. This was accomplished with a Raspberry Pi Zero equipped with just 500MB RAM and a 5MP Pi Zero camera—small in form, yet powerful in function.
This portable system delivers one-to-one streams globally without dependence on proprietary software or paid services (beyond standard mobile internet charges). Streaming is powered by the open source Motion software. The same setup can also double as a surveillance tool, capturing images and videos of intruders with date and time stamps for added security.
The Raspberry Pi Zero web camera system integrates compact hardware with open source software to provide continuous video streaming and motion detection. Fig. 1 shows the prototype. The required components are listed in the Bill of Materials table.


In addition to the components listed in the Bill of Materials table, basic soldering tools, including soldering wire, a soldering iron, and soldering paste are also required.
| Bill of Materials | |
| Components | Quantity |
| Raspberry Pi Zero W | 1 |
| 5MP Pi DSI Zero camera | 1 |
| RPi camera DSI ribbon cable | 1 |
| SD card (8GB minimum, 32GB recommended) | 1 |
| 2A, 5V Raspberry Pi power adaptor | 1 |
Hardware setup
The system consists of a Raspberry Pi Zero board connected to a 5MP Pi camera module, as shown in Fig. 1. The Pi Zero accesses the internet via a mobile phone acting as a Wi-Fi hotspot. This compact and portable configuration enables the Pi Zero to function either as a web camera or a motion detection system.
Schematic circuit: A Raspberry Pi Zero connected to a camera via its camera port.
Software components: Motion and ZeroTier
Motion
The core of the system is the open source Motion software. It includes a built-in web server that handles video streaming, motion detection, and recording. Motion captures video streams from the camera and processes them in real time. When motion is detected, it can trigger actions such as recording video, taking snapshots, and saving them locally or transmitting them over the network.
Several other software solutions, including Python and OpenCV-based setups, were evaluated. However, apart from Motion, all others proved too heavy for the Raspberry Pi Zero, resulting in unreliable streaming performance.
On the Raspberry Pi Zero, the following steps are required:
$ sudo apt install motion -y # Install motion

$ motion -h # Check the version of motion after installation

$ sudo systemctl start motion # Start the motion service

$ sudo systemctl enable motion # Enable motion to start automatically at boot
To check whether Motion is running on the local network (LAN), open a web browser on any computer connected to the same Wi-Fi network and visit: http://
This displays the live video stream from the Motion server.
$ sudo systemctl stop motion # Stop the

motion service if needed

$ sudo systemctl restart motion # Restart

the motion service

$ sudo systemctl status motion # Check

the status of the motion service

$ sudo nano /etc/motion/motion.conf #

Open the motion configuration file; most

settings are preconfigured and ready to use
Most settings are preconfigured and ready to use. No changes are required unless the exact modifications are known. Missing files or directories such as motion.log or process\_id\_file may occasionally occur. In such cases, the necessary directories or files should be created, appropriate permissions applied, and the service restarted.
The Motion software is highly flexible, and all options are configurable within the motion.conf file. The file should be read carefully to understand each option, for example, how to change the log file location, the port for streaming, and other parameters. For ease of use, a sample motion.conf file has been included as an an attachment.
ZeroTier
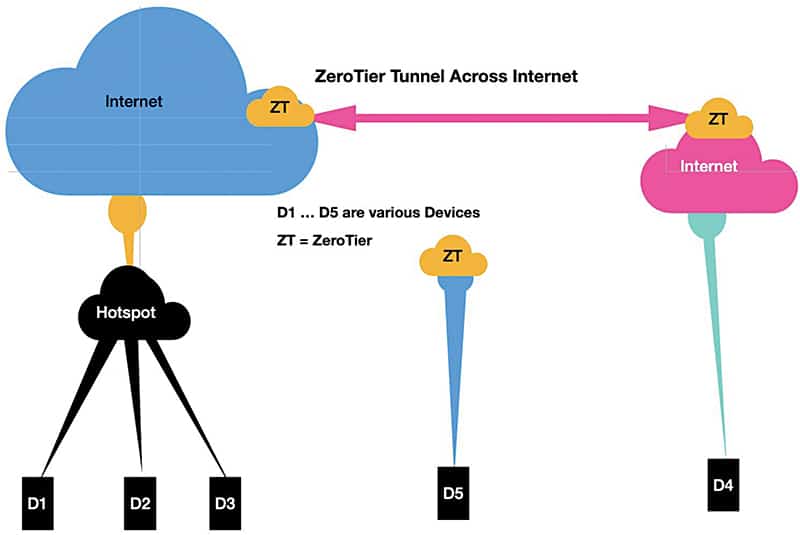
Fig. 2 illustrates how ZeroTier enables the creation of a virtual private network (VPN) tunnel across the internet, allowing multiple devices in different locations to communicate securely as if they were on the same local network. The key components shown include various devices labelled D1 through D5, internet access points (clouds), a shared hotspot for local devices, and the ZeroTier (ZT) engine, which facilitates encrypted communication.

In this setup, devices D1, D2, and D3 are connected to a common hotspot that provides internet access. These devices use ZeroTier to connect the virtual network via the public internet. Devices D4 and D5, located in different remote locations and connected to the internet through separate networks, also install ZeroTier and join the same virtual network. This configuration ensures that all devices are logically connected, regardless of their physical location.
ZeroTier creates a secure tunnel across the internet, allowing peer-to-peer or virtual LAN-like communication among all connected devices (D1-D5). This approach is suitable for scenarios such as remote device access, secure communication without traditional VPNs, and building a private network across different sites.
This virtual networking tool enables secure, encrypted one-to-one communication across the internet without complex configurations such as port forwarding. It creates a secure tunnel for the video stream to be transmitted and accessed by authorised devices anywhere in the world. Once the concept is clear, the process is straightforward.
With Motion running on the Raspberry Pi Zero, the stream is accessible on port 8081 within the local network. Any device on the same Wi-Fi network can view it by entering:
http://:8081 To make the stream available outside the local network (beyond the mobile hotspot’s NAT firewall), ZeroTier is required to create a secure pipeline between devices. When connected to the internet, ZeroTier establishes a virtual tunnel through which devices D1 through D5 connect, as shown in Fig. 2.
Step-by-step ZeroTier setup

EFY++ CONTENT: ACCESS TO THIS CONTENT IS FREE! BUT YOU NEED TO BE A REGISTERED USER.


